Total Pageviews

Saturday, November 23, 2013

Eggnog


Tis the season for eggnog! It is plentiful in the stores this time of year. 
My friends gave me the recipe and I decided to make it at home. 
My littlest one (the picky eater) said, "YUMMM! Delicious!"


Here is what you do:
One dozen eggs
One pint heavy cream
One pint milk
1/2 cup sugar (or sugar substitute)
Nutmeg


Put it in the blender.
 (You can dissolve the sugar in the milk if you want but I was too lazy to do this.)


Enjoy!

Thanks Craig and Kristin for the recipe!


Wednesday, November 20, 2013

Ranch Dressing

I am always trying to get my kids to eat healthier. One goal was to get them off store bought Ranch Dressing since it is not healthy (in my opinion). I've been wanting to try a homemade ranch dressing for many months now. Here are two recipes I found.
Click here or here.  (You will have to scroll down a bit on both links since both links have multiple recipes posted.)

Here is what I did:
Combine 1/2 cup milk kefir or yogurt (I used homemade) with 1/2 cup mayonnaise


1/2 teaspoon garlic powder, 1/4 tsp onion powder, 1/4 tsp ground pepper,
2 tsp parsley, 1 tsp dill (Dried from my garden!), sea salt to taste.


Stir and refrigerate.  
My little one didn't even notice the difference in taste when I served it to him with his carrots.  And he is the picky eater. Score!

My next step is to make homemade mayo...

Monday, November 18, 2013

Lacto-Fermented Dehydrated Applesauce Fruit Leather

I recently did an experiment. I dehydrated homemade lacto-fermented applesauce and store bought applesauce to see which my family would like better.  Results below.  I got the recipe from here.

Here is how I made Lacto-Fermented Applesauce Fruit Leather:
Peel 7 medium sized organic apples. 


Cut apples into sections.


Add 1.5 teaspoons cinnamon and 2 Tablespoons whey to your apples.


 In a Vitamix or blender, blend until applesauce consistency.


Put the applesauce in a airlock quart size canning jar.
Let it sit on the shelf for 1-3 days. I let it sit for one day only. It ferments really fast.


Pour the lacto-fermented applesauce on a dehydrator tray (I cover my tray with parchment paper).  Dehydrate for 12 hours.
Peel the fruit leather off the parchment paper and cut in strips. The store bought applesauce is the lighter colored fruit leather. The lacto-fermented fruit leather is darker because I added cinnamon.  Enjoy!


Results of my experiment:
My husband and oldest son preferred the homemade applesauce fruit leather over the store bought applesauce fruit leather. They said it was less tart and more sweet.  My youngest son wouldn't even try it and he LOVES applesauce.

Dairy Yogurt

Dairy kefir is so much easier to make than yogurt. Just like dairy kefir, yogurt is full of healthy probiotics to aid digestion and fill our intestinal tract with good guys so the bad guys don't take over.  There are many ways to make yogurt but this is how I do it.


Pour a gallon of whole milk into 4 quart size canning jars. Put a washcloth in the bottom of a stock pot filled with water and put the jars in it.  Put the stock pot on a burner and turn the burner on high.


 Using a thermometer make sure your milk heats to 180 degrees F.


Take your 4 quarts of milk out of the water and sit them on the counter top without lids. Let them sit until the milk gets to 110 degrees F.


Once milk is 110 degrees F add 2 Tablespoons of yogurt with live enzymes (either store bought or homemade) into each quart jar and stir. You could also use a yogurt starter but this is a more expensive way of making yogurt. Then put lids on the jars and put in the dehydrator.


Set the dehydrator at 110 degrees F for 24 hours. Wa-lah! Yogurt! Put it in the fridge to get it cold and enjoy. Or you can strain out the whey and turn your yogurt into greek yogurt. That is my favorite way to enjoy it.

Don't forget to save some yogurt to start your next batch!

Sunday, November 17, 2013

Dairy Kefir

Dairy kefir is really simple to make.  It is much easier to make than yogurt. Kefir is full of helpful probiotics and very healthy for you.

This is what kefir grains look like.


You put your kefir grains into a quart of milk. I use whole milk but you can use any type of milk, including raw.  Kefir needs oxygen to work so secure a paper towel over the top with a rubber band. Every 10 days your kefir grains will multiply and you can eat them, give them to a friend, or make more kefir. 


Let your kefir sit out for 24 hours. Strain the grains and enjoy.


Or you can do what I do and strain the whey out of the kefir for a thicker consistency. Save the whey in the fridge for future use.


My favorite way to eat kefir is with berries on top. Kefir is an acquired taste. It is a bit tart but delicious.

Troubleshooting:
If your kefir separates into curds and whey it means it ran out of food to eat. You will need to take out some grains so this doesn't happen again or add more milk or let it sit out for a shorter period of time. It is still good to eat through, just stir it a bit and strain.


You can order your dairy kefir grains from Kefir Lady or Cultures for Health or from me for $10 plus shipping.

If you ever want to take a break from making kefir, put the grains in the fridge in some milk for a week. Change the milk every week. The grains will become sluggish and will take a few times of making kefir again to revive them. If they turn pinkish or grow mold throw them away.


Saturday, November 16, 2013

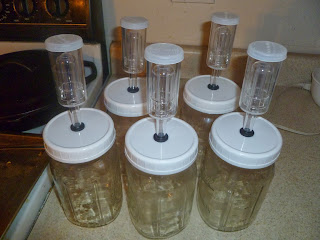
DIY: Airlock Lids (aka Kraut Kaps)

In order to ferment certain foods you want an airtight lid that allows gases to escape without allowing oxygen to enter the jar. I did my homework researching different types of airlock lids.  I found the method below to be the cheapest and easiest to make.

Here is how I did it:
(1) Go to your local home brew store and buy airlocks ($1.09) and grommets ($.45).
(2) Go to Ace Hardware or here and buy plastic lids that fit canning jars. You can get wide mouth or regular mouth sizes. I prefer wide mouth. ($4.49 for 8)
(3) Go to etsy.com Primal Kitchen and buy seals to make the jars airtight. ($6.98 for 4)
(4) Using a 1/2 inch drill bit to put a hole in the lids, insert the grommet and airlock and you are done. It takes a minute to assemble each one.

These sell for $9.99 here but it only costs $3.38 when you make it yourself!


Rejuvelac

Wikipedia states:
Rejuvelac is a non-alcoholic fermented liquid made from sprouted grains. It is purported to improve digestion of food. Rejuvelac can be drunk as a digestive aid or used as a starter culture for other fermented foods such as raw nut and seed yoghurts, cheeses, sauces and Essene Breads. Rejuvelac is prepared using whole wheatoatsryequinoabarleymilletbuckwheatrice and other types of grain. Rejuvelac is cloudy, with the colour of pale straw. It has a flavour that is lemony, sharp and slightly tangy, with a mild earthy aroma..

I used quinoa to make rejuvelac since I eat gluten free.

Here is what I did:
(1) Measure one cup quinoa (or other grain) and put in nut bag.
(2) Rinse with water 2-3 times a day for 2-3 days.The quinoa is ready once it grows tails (starts sprouting).
(3) Then I put it in a half gallon size canning jar covered by a paper towel and rubber band. I kept the quinoa in the nut bag so it would be easy to dispose of the quinoa when finished.
(4) For 3 days I let it sit. 
(5) I knew the rejuvelac was done once it had a lemony flavor and looked cloudy.
(6) I discarded the seeds and put the beverage in the fridge for later.


Water Kefir (Bubble Juice)

One of the first things I learned how to ferment was water kefir.  It's really simple.

Here is the recipe:
3 cups filtered (non-chlorinated) water
3 T. water kefir grains
3 T. sugar (actually 2 T. sugar, 1T. unsulfered molasses)
Just remember: 3-3-3.
Let it sit in a quart size canning jar for 48 hours with a paper towel and rubber band over the top. Strain the grains using a strainer. Your grains will double every 48 hours. Drink and enjoy! If you want different flavors you can also do a second ferment meaning you add in the flavor you want and let it sit another day or two.

Don't know what to do with your extra water kefir grains:
1. Give them away.
2. Eat them (especially good in smoothies)
3. Make twice as much water kefir


To get my kids used to the carbonation and flavor I call it Bubble Juice and they get to pick if they want apple or orange juice in their water kefir.


You can get water kefir grains from me for $5 plus the price of shipping.  You can also order them from Cultures For Health or Kefir Lady.

Let me know your favorite way to flavor your water kefir. I like vanilla/cherry or raspberry/blueberry/blackberry the best.


Friday, November 15, 2013

Adventures with Fermentation

A month ago I attended the first session presented by Andrea Fabry about Fermentation. She inspired me with her story and I'm now hooked on fermentation. In this past month I have fermented:
(1) Water Kefir
(2) Dairy Kefir
(3) Yogurt
(4) Ginger Bug/ Ginger Ale
(5) Cabbage Juice Tonic
(6) Sauerkraut
(7) Zucchini and Garlic
(8) Cranberries and Ginger
(9) Rejuvelac
(10) Kombucha
(11) Applesauce/ Fruit Leather
(12) Creme Fraiche
(13) Beet Kvass

I hope to revive this blog and post about all the fun I'm having in the kitchen with fermentation. Andrea's website is http://justso.co/. Check out her dramatic health story.

Upcoming Lectures by Andrea Fabry at St, Marks Presbyterian Church, Tucson, AZ ($10):
Jan. 15, 2014 Beverages: kombucha, beet kvass, ginger bug/termeric bug
Feb. 15, 2014 Fruit fermentation. Includes chutney, fruit leather, apple cider vinegar, ketchup.
March 15, 2014 Vegetable ferments. Includes in-depth look at making sauerkraut.
April 19, 2014 Japanese ferments. Includes natto, nuka, and kimchi.
May 17, 2014 Efficient Microorganisms

If you are new to fermenting I recommend you check out these books:
(1) Real Food Fermentation by Alex Lewin; This book is full of colorful pictures with easy step by step directions for the beginner.
(2)Nourishing Traditions by Sally Fallon
(3) Wild Fermentation by Sandor Katz and Sally Fallon

Stay tuned for more about fermentation...